DTF troubleshooting is the practical path to reliable transfers in today’s garment printing. This introductory guide helps you diagnose DTF adhesion problems and DTF peel issues so designs stay crisp from first print to last wash. By focusing on material selection, surface prep, and DTF transfer troubleshooting steps, along with careful DTF heat press settings, you can turn common failures into repeatable results. We also share practical DTF ink adhesion tips to reinforce the bond to cotton, blends, and technical fabrics. Understanding how each step affects adhesion and transfer quality helps you save time, waste less material, and scale your production.
From a broader perspective, direct-to-film printing challenges—often framed as bonding issues between the film and fabric—can derail a project if not addressed. Common roadblocks include DTF adhesion problems, DTF peel issues, or DTF transfer troubleshooting missteps that throw off transfer quality. Optimizing this workflow hinges on fabric selection, surface preparation, and consistent heat-press settings (DTF heat press settings), paired with reliable ink chemistry and DTF ink adhesion tips. By using these alternative terms and closely related concepts, you align your content with search intents that users and search engines associate with DTF performance.
DTF Adhesion Foundations: Fabric, Pre-Treatment, and Ink Chemistry
Understanding the root causes of adhesion begins with fabric choice and substrate preparation. Different fabrics—cotton, blends, and technical materials—interact with pre-treatment and inks in distinct ways, which lies at the heart of DTF adhesion problems. A robust bond requires selecting fabrics with compatible fiber content and implementing a consistent pretreatment regimen that promotes ink penetration and fiber bonding. When adhesion problems appear, the first step is to map how fabric structure, weave, and surface energy influence the transfer. In practice, this means reviewing fiber content, topcoat compatibility, and whether the pre-treatment is calibrated for the specific textile. On the ink side, formulation and curing window play critical roles; inadequate curing can leave a soft, underdeveloped film that delaminates, while over-curing can embrittle the binder and promote cracking. Finally, adhesive powder quality and uniform application matter: a tight, even powder matrix supports long-term adhesion and resists peeling during wash cycles. By establishing a baseline for each fabric type, you can diagnose adhesion issues before they start.
Transfer film quality and surface preparation influence how well the design bonds to the substrate. Use a high-quality transfer film with consistent release to minimize drag during the transfer, which otherwise can contribute to adhesion variability and weak bond lines. The interplay between adhesive powder, fabric, and ink dictates the final feel of the print and its wash performance. Consider maintaining a log of fabric types and pre-treatments used for each run, and pair this with a simple test grid to monitor bond strength across different materials. In addition, align ink chemistry and curing profiles with the powder system; mismatches can create weak interfaces that peel or delaminate under heat or moisture. For teams, a shared vocabulary around compatibility—fabric, pretreatment, powder, ink, and film—helps pinpoint whether adhesion problems originate on the substrate or within film construction.
Pre-Treatment and Fabric Prep Best Practices
Pre-treatment is a critical control point for successful DTF printing. Insufficient or overly aggressive pretreatment can limit ink penetration and bonding, creating vulnerable interfaces that show up as premature peeling. The goal is a uniform, fabric-friendly coating that remains stable through handling, curing, and wash cycles. When selecting a pre-treatment, match the fiber composition, weave, and absorbency to a consistent spray, dip, or pad process, then verify coverage with a simple visual and moisture test. Diligence at this step reduces the incidence of delamination and improves color saturation by ensuring the ink properly anchors to the fiber surface.
Drying and curing of the pre-treated fabric are equally important. Allow adequate drying time for the coating to set before printing, and avoid stacking or crowding that traps moisture. Keep treated fabrics stored in clean, low-dust environments to prevent contamination that could interfere with adhesion. When introducing new fabrics or pretreatment formulations, run a small matrix of test swatches to verify bonding, color fidelity, and hand feel prior to a full production run. Document coating type, dwell time, and drying temperature to support repeatable results.
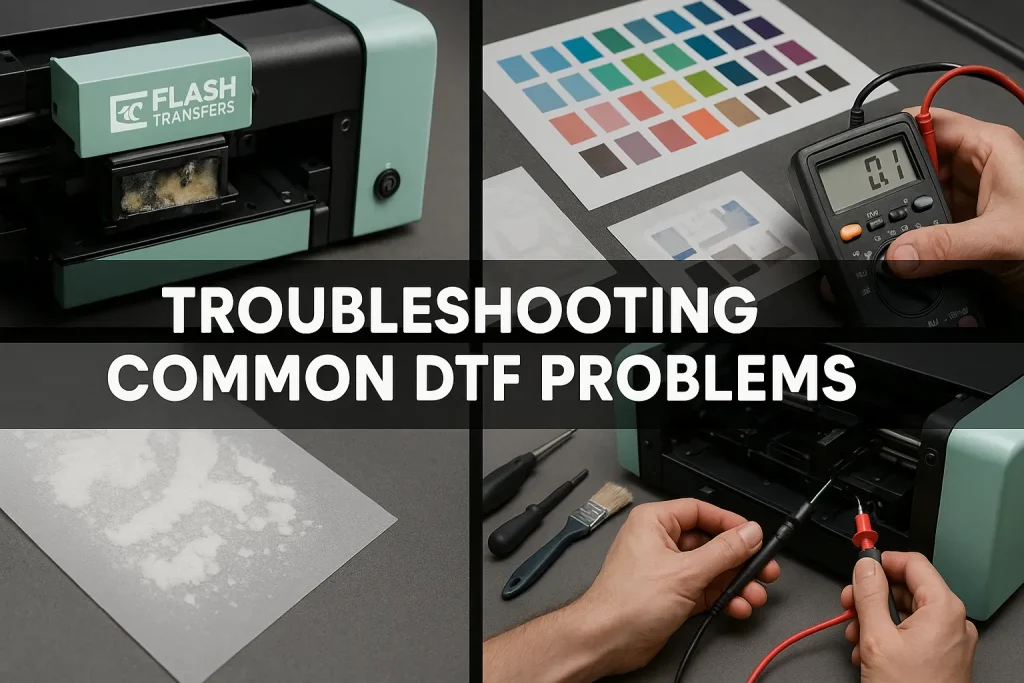
DTF Troubleshooting: A Systematic Flow for Adhesion and Peel
DTF Troubleshooting begins with a structured check of print quality and transfer readiness. Confirm print fidelity by inspecting color saturation, uniformity, and edge definition, since poor image quality can mask or exacerbate adhesion and peel problems. Ensure you’re using the correct printer profile and color management settings for the substrate, as mismatches can propagate into post-transfer performance. Then evaluate whether the printed film shows consistent thickness and even darkness across the design, which helps distinguish ink-related issues from bonding problems. This phase also involves recognizing signs of DTF peel issues at the surface, such as lifted edges or uneven transfer that indicate timing or material mismatches. By linking printing defects to downstream performance, you create a traceable path toward reliable results.
Next, assess fabric prep, powder coverage, and curing. Verify fabric type and weight to select the appropriate pre-treatment and adhesive powder; ensure powder is evenly applied and cured according to recommendations. Inconsistent powder or premature handling can weaken adhesion and encourage peel during transfer. Then examine ink and film compatibility, confirming that ink formulations work with your powder and fabric and that the transfer film releases predictably. If mis-match exists, replace or adjust components before proceeding to heat pressing, to reduce the risk of transfer failure and to address both DTF adhesion problems and DTF peel issues at the source. This workflow then guides you to optimize heat-press settings and post-press care in a repeatable, data-driven way.
Calibrating Heat Press Settings for Consistent Transfers
Heat-press settings are a frequent source of variation in DTF performance. Determine an ideal range for your fabric and ink system by validating temperature accuracy, dwell time, and pressure uniformity. Start with manufacturer guidance and then build a small matrix across common fabrics—cotton, blends, and synthetics—to map bond strength and surface finish. Use a teflon sheet or silicone layer when indicated to promote even heat distribution and protect the transfer from drag or scorching. Document observed differences between runs and adjust in small increments to avoid over- or under-curing that can lead to embrittlement or insufficient bond.
Once you establish a baseline, integrate routine calibration into maintenance. Regularly check the heat platen temperature against a known standard, verify dwell time consistency, and verify pressure uniformity across the platen using a simple shim or pressure map. Adopt a standard procedure for heat-press ramping and cooling to minimize thermal shock that can contribute to edge peeling or surface mottling. Pair these settings with a control print to monitor stability over time, and continue refining dwell time and temperature as new fabrics or inks are introduced.
Ink and Powder Synergy: Achieving Strong Bond and Smooth Finish
Optimal DTF bonding depends on a compatible ink and powder pairing. Work with inks designed for DTF that deliver consistent viscosity, pigment load, and cure responsiveness with your chosen adhesive powder. Align curing windows with the binder chemistry to avoid under- or over-cure, which undermines adhesion and can produce a rough surface finish. A strong bond begins with the powder: verify particle size, loading rate, and coverage uniformity to form a robust matrix that resists cracking and lift. Together, ink formulation and powder application determine the long-term wash performance and color fidelity of the transfer.
To further improve this area, consider DTF ink adhesion tips from experienced printers and supplier guides to evaluate bond strength and surface finish. Use a high-quality transfer film with controlled release to minimize drag and ensure clean transfer—since film quality can directly influence adhesion integrity and the feel of the print. Keep an eye on the interaction between the ink’s solvent system and the powder’s adhesive binder, as mismatches can manifest as gloss variation, tackiness, or edge peeling during handling and after washing. Regularly review and update your ink-powder pairing as fabrics evolve and new formulations enter the market.
Quality Control, Testing, and Documentation for Repeatable Results
Establish a formal testing protocol to track adhesion and peel performance across fabrics, pretreatments, and runs. Create a standard test sheet that includes representative garments or swatches and monitor adhesion strength, edge integrity, and surface evenness over time. Record environmental conditions during curing and pressing, since temperature and humidity impact ink and powder behavior. By keeping a control lot in each batch, you can compare outcomes when you adjust powders, inks, or pretreatments and quickly identify the source of changes in bond quality or peel behavior. This data-driven approach helps convert intuition into repeatable results.
Document all changes—powder type, ink formulation, pretreatment, heat-press settings, and transfer film. Use a simple change log to trace decisions and outcomes, making it easier to reproduce successful runs and diagnose failures. Conduct controlled wash tests to simulate real-world wear and assess long-term adhesion under typical laundering conditions. Finally, implement a periodic review of process parameters and supplier recommendations so your DTF transfer troubleshooting remains proactive rather than reactive, maintaining consistent adhesion and reducing peel failures over time.
Frequently Asked Questions
What are common DTF adhesion problems and how can I diagnose them?
DTF adhesion problems often show as flaking, incomplete transfer, or dull areas where the ink isn’t bonding to the fabric. To diagnose, inspect the printed film for uniform color, verify fabric type and pre-treatment, confirm ink curing, and check powder coverage and transfer film quality. Ensure you use the correct printer profile and cure at the right time and temperature for your specific fabric, powder, and ink system.
How can I address DTF peel issues during transfer?
DTF peel issues appear as edges lifting or partial transfers. Root causes include too-low heat-press temperature or insufficient dwell time, inconsistent pressure, post-press handling, or ink/powder mismatch. Adjust heat-press settings for your fabric and ink, ensure steady pressure, let the transfer cool properly, and avoid contamination on the fabric surface.
What is a practical DTF transfer troubleshooting workflow I can follow to fix issues consistently?
Use a repeatable workflow: 1) confirm print quality and design integrity; 2) evaluate fabric type and prep; 3) check powder coverage and curing; 4) inspect ink and film compatibility; 5) optimize heat-press settings; 6) control cooling and post-press handling; 7) test, document, and iterate to build reliable guidelines for future runs.
How should I optimize DTF heat press settings for durable transfers?
DTF heat press settings should be tailored to the fabric and ink system. Focus on achieving the right heat-press temperature range, dwell time, and even pressure so the bond cures consistently without over- or under-curing. Use a protective sheet like a teflon or silicone layer and regularly calibrate the press to maintain stable temperature and pressure.
What are some DTF ink adhesion tips to improve bond strength and reduce peeling?
DTF ink adhesion tips include using inks designed for DTF with strong bond properties to your chosen powder, ensuring compatible curing windows, and maintaining equipment that delivers the required temperature and time. Avoid under- or over-curing and validate adhesion through controlled tests and wash simulations.
What quality control practices support DTF transfer troubleshooting and prevent adhesion problems?
Implement standard test sheets, track environmental conditions (temperature and humidity) during curing and pressing, use a control lot for each batch, perform wash tests, and maintain a change log of powders, inks, pretreatments, and equipment adjustments to trace results and improve repeatability.
| Topic | Key Points | Notes |
|---|---|---|
| What is DTF troubleshooting? | A repeatable, science‑based process to diagnose and fix adhesion and peel issues in direct-to-film printing. | Focuses on root causes and a practical workflow to improve production consistency. |
| Common adhesion problems | Adhesion failures can show as flaking, incomplete transfer, or dull areas where ink won’t bond. | Linked to fabric type, pre‑treatment, ink chemistry, curing, and powder coverage. |
| Root causes of adhesion problems | Fabric composition/ weave, optimized pre‑treatment, ink formulation and curing, powder coverage and cure, transfer film quality. | Each factor affects how well the ink bonds to the textile. |
| DTF peel problems and root causes | Peel issues include lifting edges, partial transfers, or tacky finishes. | Causes include temperature, pressure, cooling/handling, ink–powder mismatch, and substrate contamination. |
| Practical DTF troubleshooting workflow | A step‑by‑step method to diagnose and fix adhesion/peel problems. | Covers print checks, fabric prep, powder curing, ink/film compatibility, heat‑press settings, cooling, documentation. |
| Materials and process tweaks for better adhesion | Choosing fabrics, powders, inks, and transfer films tuned for DTF; calibrating heat‑press. | Aim is reliable bonding across fabrics with consistent process control. |
| Best practices for testing and quality control | Systematic testing and QC into production. | Test sheets, environmental tracking, control lots, wash validation, and change documentation. |

