UV DTF Transfer is a game-changing method for garment customization, blending the vivid results of UV DTF printing with the convenience of direct-to-film transfers. This UV DTF Transfer approach delivers sharp details and a broad color gamut on a wide range of substrates, making it a strong option for brands and crafters. For those evaluating options, understanding how to use UV DTF transfers, the role of DTF transfer media, and the differences between DTF vs UV DTF can clarify which UV DTF Transfer workflow fits a project. When done correctly, the durability of UV DTF transfers remains strong through washing and wear, balancing color retention with practical care. This guide covers best practices, care tips, and real-world considerations to help you maximize durability and optimize results.
This alternative framing treats the process as a UV-curable image-on-film technique that is pressed onto garments or other surfaces. Often called UV-printed transfer media or print-on-film solutions, it emphasizes the same end result—a durable, high-detail graphic applied via heat and pressure. From an SEO and LSI perspective, terms such as UV-printed transfers, transfer film with UV inks, and the durability of UV-printed graphics align with user search intent. In practice, designers focus on color fidelity, substrate compatibility, and a smooth workflow for one-off items or small batches. By understanding these LSIs, you can broaden your content strategy while staying true to the core concept of UV-activated printing on transfer media.
What is UV DTF Transfer and How It Compares to Traditional DTF
UV DTF Transfer combines UV-curable printing on a transfer film with the familiar heat-press transfer method, resulting in bright, detailed images that can be applied to a wide range of substrates. This approach leverages UV DTF printing to create crisp lines, high color fidelity, and sharp gradients directly on the transfer film, which is then bonded to fabrics or hard surfaces via heat and pressure. As a result, designers can achieve rich colors and fine details that translate well from screen to final product, while keeping the workflow approachable for small batches or single-item customization.
Compared to traditional DTF, UV DTF Transfer often delivers crisper edges and better color consistency, especially on complex graphics. The UV process can expand substrate versatility beyond textiles to including some hard surfaces, reducing creative bottlenecks for mixed-material projects. While both methods rely on an adhesive layer and heat, the UV approach emphasizes 1:1 color reproduction and reduced color bleed, which can simplify color management and improve overall durability when properly cured.
The UV DTF Workflow: From Design to Transfer
A strong UV DTF project starts with design and color management. Start with high-resolution artwork sized for the final product, and perform color checks to ensure that what you see on screen closely matches the printed transfer film. This phase benefits from calibrating your monitor and using consistent color profiles so that the output aligns with your intended appearance on the garment or surface.
Next comes UV printing on the transfer film, where UV-curable inks are laid down with attention to edge sharpness and color density. Depending on the design, multiple passes may be used to build solid areas, followed by highlights and gradients. After printing, some workflows require a curing step to set the ink on the film before transfer, which helps prevent smudging and color bleed during handling and the subsequent heat press.
Substrates and Surface Prep for UV DTF Transfer
UV DTF Transfer is valued for its substrate versatility. It can be applied to 100% cotton, cotton blends, polyester blends, tote bags, caps, and even some hard surfaces like wood or certain plastics when the adhesive and heat settings are compatible. Pre-washing fabrics, ensuring a clean surface, and controlling moisture are essential preparation steps that improve adhesion and finish, particularly on textiles where fiber content can influence longevity.
For hard substrates, verify adhesive compatibility and heat tolerance before transfer. The carrier and adhesive often require specific curing or pre-heating conditions to maximize bond strength and prevent delamination. Always run a test piece on the chosen substrate to confirm adhesion, color accuracy, and finish before offering products to customers.
Durability, Care, and Longevity of UV DTF Transfers
Durability is a central consideration for UV DTF transfers. When properly cured and transferred, the graphics tend to resist cracking and fading better than some alternatives, with color retention held through typical wear and washing cycles. For textiles, advising customers to follow garment care labels, wash in cold water, and turn garments inside out helps preserve the transferred image and adhesive integrity over time.
On hard surfaces, care emphasizes avoiding abrasive cleaners that could dull the finish, and wiping rather than scrubbing to maintain clarity of the design. The durability of UV DTF transfers hinges on substrate compatibility, cure parameters, and proper heat-press settings, so ongoing testing and adherence to manufacturer’s guidelines are key to achieving long-lasting results.
Troubleshooting Common Issues with UV DTF Transfers
If colors appear dull or fade after washing, revisit curing time and temperature to ensure the ink was fully set on the film and that the adhesive bonded properly to the substrate. Testing with a small swatch can help confirm the right balance between curing and adhesion, and adjusting wash cycles or garment handling can prevent rapid color loss.
Peeling, edge lifting, or cracking often point to substrate dryness, insufficient pre-press, or incorrect heat-press settings. Ensure the transfer is aligned correctly, the surface is dry and smooth, and the temperature, time, and pressure match the film’s specifications. For fine details, verify that the film’s carrier was fully peeled and that no residue interferes with the bond.
Best Practices for Designers and Makers Using UV DTF Transfers
Design with intent by optimizing artwork for final size and substrate texture. Textures, folds, and fabric weave can influence how colors appear, so plan for these factors in your design and color management workflow. Prototyping with test pieces helps you iterate quickly on color, curing, and transfer parameters.
Calibrate equipment and prepare substrates consistently. Regularly check printer ink consistency, heat-press temperature accuracy, and adhesive behavior across batches. Document curing times, temperatures, and pressure ranges to build a reliable library of parameter sets that can guide future UV DTF projects, and always consider encapsulation or finishing techniques to protect the final product in high-use scenarios.
Frequently Asked Questions
What is UV DTF Transfer, and how does DTF vs UV DTF differ in practice?
UV DTF Transfer is a method where an image is printed on a transfer film with UV-curable inks and then bonded to a substrate with heat and pressure. DTF vs UV DTF differ mainly in how the image is produced and adheres: UV DTF uses UV printing on the film for sharper detail and broader color, while traditional DTF relies on a hot-melt adhesive on the transfer medium. When executed properly, UV DTF can deliver bright, durable graphics on a wider range of materials, though results depend on the substrate and curing.
How to use UV DTF transfers?
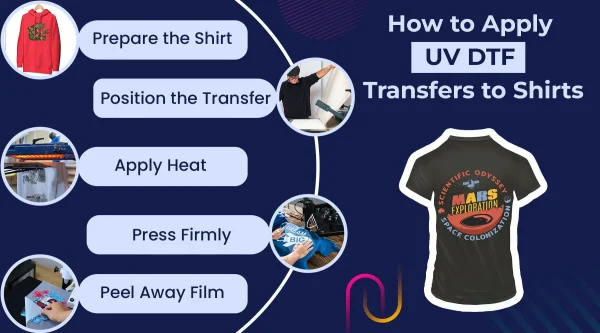
Design your artwork at the final size and optimize colors for UV printing. Print the design onto UV DTF transfer film, then cure if required by your film or ink. Pre-press the substrate to remove moisture and crease lines, align the transfer, and apply heat and pressure according to the film’s guidelines. Let it cool before handling to ensure a clean finish.
What substrates can UV DTF Transfer work on?
UV DTF Transfer is versatile and works on fabrics (100% cotton, cotton blends, and polyester blends), as well as hard surfaces like wood and acrylic when the film’s adhesive is compatible. Some metals may be suitable with specific adhesive formulations. Always pre-test adhesion on the chosen substrate to confirm results before production.
How durable are UV DTF transfers, and how should I care for them?
When properly cured and pressed with the recommended temperature and time, UV DTF transfers offer strong adhesion and color retention. Follow garment care guidance: wash inside out in cold water, use mild detergents, and avoid high-heat drying or abrasion. For hard surfaces, wipe with a soft cloth and avoid abrasive cleaners to preserve the finish.
How does UV DTF printing affect color fidelity and edge sharpness?
UV DTF printing delivers high color accuracy and crisp edges thanks to UV inks and precise curing. Calibrate your color workflow, design at the intended size, and run test prints to ensure faithful reproduction across fabrics and substrates. Proper lighting, color management, and substrate compatibility further improve results.
What are common issues with UV DTF Transfer and how can I troubleshoot?
Common issues include fading after washing, peeling at edges, cracking, dull details, and smearing. Troubleshoot by confirming proper curing time and temperature, ensuring the transfer is fully adhered, verifying substrate dryness and appropriate heat-press settings, and checking image resolution and carrier removal. Conduct small tests on your substrate to identify parameter adjustments before large runs.
| Aspect | Key Points |
|---|---|
| What is UV DTF Transfer | A process where an image is printed on a transfer film using UV-curable inks, then transferred to fabrics or hard substrates with heat and pressure. It combines UV printing’s color fidelity with DTF transfer media to produce bright, durable graphics on materials like cotton, blends, polyester, wood, or metal with proper settings. |
| How it differs from traditional DTF | Uses UV-curable inks and a UV printer to print on transfer film, followed by heat transfer. Often yields crisper color and sharper detail and can support a broader substrate range (including some hard surfaces). Still requires curing and heat pressing like standard DTF. |
| Core workflow steps | Design and color management; UV printing on the transfer film; curing (if required); heat transfer to the substrate with appropriate temperature, time, and pressure. |
| Substrates | 100% cotton and blends, polyester blends; tote bags, caps; hard substrates such as wood, acrylic, and some metals (with compatible adhesive and heat settings); leather and faux leather with suitable formulations. |
| Materials & equipment | UV transfer film with adhesive and carrier; UV-curable inks; UV-compatible printer; heat press or conveyor press; barrier/parchment paper; thermometer; design software and color management tools; optional curing unit. |
| Maintenance & workflow | Keep printer and curing units clean and calibrated; store films in a cool, dry place away from UV; maintain small test prints; pre-press substrates; ensure proper adhesive activation and consistent parameter checks. |
| Durability, care, and longevity | Proper curing and post-transfer care lead to strong adhesion and color retention. Follow garment care labels (wash cold, inside-out, mild detergents). For hard substrates, wipe clean and avoid abrasives. With correct curing and care, UV DTF transfers offer good resistance to cracking and fading. |
| Troubleshooting common issues | Fading after washing, peeling/edge lifting, cracking, dim details, smearing—address by checking cure time/temperature, substrate dryness, alignment, transfer film peeling, and ink curing. Run tests and adjust parameters as needed. |
| Best practices | Design for final size and substrate; proof and test on the chosen material; calibrate equipment; prepare clean, dry substrates; consider encapsulation or a finishing step for durability. |
Summary
HTML table of key points about UV DTF Transfer.