DTF workflow for beginners offers a practical path from concept to wearable art, perfect for makers exploring garment decoration. By following the DTF printing basics, you learn how to plan artwork and color management. The guide breaks the process into clear DTF transfer steps, from design to dress workflow. This Direct-to-Film printing guide emphasizes a clean, repeatable pipeline. Along the way, you’ll find beginners DTF tips that boost confidence and reduce waste.
From concept to cloth, the entry-level film-based printing path centers on planning artwork, fabric prep, and careful heat transfer. Readers learn through a repeatable pipeline that resembles a design-to-dress workflow, but with emphasis on beginner-friendly steps like layout, color management, and material selection. Alternative terms such as fabric-printing on PET film, adhesive powder application, and heat-press timing help connect the same process to different search queries. Shaping your approach with gradual complexity, you build practical skills in color layering, underbase handling, and post-transfer care.
DTF workflow for beginners: From concept to garment
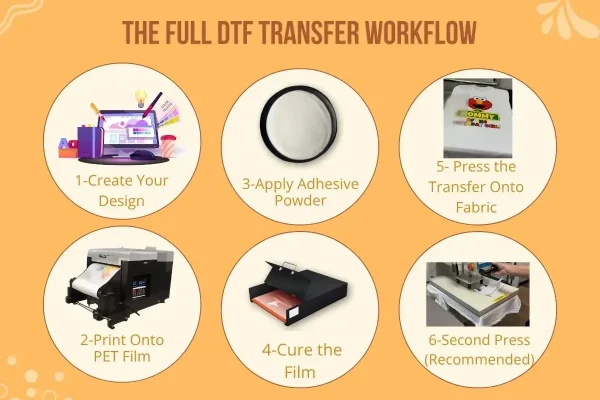
Starting with a clear, repeatable pipeline helps beginners turn ideas into wearables. The DTF workflow for beginners emphasizes a simple sequence: design, print on PET film, powder and cure, transfer with heat and pressure, then finish and care for the garment. By treating the process as a design-to-dress workflow, you gain consistency and confidence with every project.
Keep designs simple at first and focus on fundamentals like resolution, margins, and color management. Use a white underbase where needed, plan placement on apparel, and maintain a written log of settings for different fabrics. This practical approach mirrors the design-to-dress workflow and keeps the path to wearable products approachable for newcomers.
DTF printing basics and color management for beginners
DTF printing basics demand careful calibration of your printer, ink, and film. Start by validating nozzle health, accurate color reproduction, and reliable white ink coverage if you use a white underbase. Choosing quality PET film designed for DTF transfers improves bite and color depth, making results more predictable.
Pair your printer with appropriate RIP or color-management software to manage separations and soft proofing. Consistent workflow and color profiles reduce surprises on fabrics, helping you reproduce reliable results across runs. Over time, you’ll internalize the key ideas behind DTF printing basics and build confidence in color fidelity.
Direct-to-Film printing guide: Step-by-step overview
Step 1 in the Direct-to-Film printing guide is design and file preparation. Turn your artwork into print-ready files, planning for a white underbase, color layers, and safe margins. Use high-resolution images or vector art and set up proper margins to ensure clean alignment on apparel.
Step 2 in the guide covers printing prep and film compatibility, including color separation, white ink handling, and ensuring the film is suitable for your printer. This stage reinforces practical routines for beginners and highlights the importance of careful preparation before you move to powdering and curing.
Design to dress workflow fundamentals for new makers
The design to dress workflow centers on planning how a design translates from digital art to fabric. Begin with scalable artwork, clear color decisions, and print-ready files that anticipate garment color and fabric texture. By focusing on placement, margins, and sizing, you create a repeatable path from concept to finished piece.
As you build proficiency, adapt your designs to different fabrics and garment types. The design to dress workflow becomes a flexible framework, helping you scale from single-item projects to small runs. Documenting successful configurations creates a personal reference library aligned with your growing skill set.
DTF transfer steps: heat, time, and pressure mastery
The transfer stage is the heart of the process. Pre-press the garment to remove moisture, align the film precisely, and set initial heat and time targets based on your materials. A steady, even pressure and a confident, controlled press help you achieve consistent color transfer.
During transfer, peeling the film at the right moment—hot or warm—affects color depth and ghosting. Practice with scraps to fine-tune temperatures, times, and pressure, and always follow your film and adhesive supplier guidelines. Mastery of DTF transfer steps leads to reliable results across fabrics and designs.
Beginners DTF tips: practical guidance for consistent results
Start simple with one- or two-color designs to learn the core mechanics before tackling complex artwork. Maintain a consistent workflow by documenting every setting for each fabric type and print job, creating a reliable reference you can reuse.
Keep your workspace clean and organized, invest in essential accessories (tape, heat-resistant mats, clamps), and test on swatches before committing to a garment. Build a library of fabrics and care criteria so your designs look good on a variety of materials, reinforcing the beginners DTF tips that underpin steady progress.
Frequently Asked Questions
DTF workflow for beginners: what are the essential steps from design to dress?
The core DTF workflow for beginners follows a repeatable pipeline: design and file preparation; printing prep and the DTF print process; powdering and curing; transfer to fabric; finishing and care; and troubleshooting as you gain experience. This design-to-dress workflow helps you stay organized and reproduce results across projects. Start with clean artwork, calibrate your printer for consistent DTF printing basics, and keep notes on settings to improve over time.
DTF printing basics in the DTF workflow for beginners: what should I know before printing?
DTF printing basics include proper printer calibration, using RIP software for color separation and white ink, printing on PET film designed for DTF transfers, and ensuring a thick enough white underbase on dark fabrics. Mastering these basics helps the DTF workflow for beginners produce predictable results and reduces rework.
DTF transfer steps: how do I complete the transfer correctly during the DTF workflow for beginners?
The DTF transfer steps involve pre-pressing the garment, positioning the film accurately, applying the recommended heat and pressure, and peeling the film at the right moment while hot or warm. Following these transfer steps consistently yields reliable adhesion and color fidelity within the DTF workflow for beginners.
Direct-to-Film printing guide for beginners: how does the design-to-dress workflow apply?
The Direct-to-Film printing guide for beginners highlights designing for print, choosing colors, and aligning artwork for garment placement. In a design-to-dress workflow, you print a test swatch, keep consistent margins, and then transfer to fabric using the steps above. Start with simple designs and build your color management as you go.
Beginners DTF tips: what practical tips help me improve in the DTF workflow for beginners?
Practical beginners DTF tips include starting with a single-color or two-color design, documenting settings for each fabric, investing in reliable heat press accessories, testing on scrap garments, and keeping a clean, organized workspace. Following these tips supports a consistent DTF workflow for beginners and helps you scale up later.
Design to dress workflow: how should a beginner structure a simple project in the DTF workflow for beginners?
Structure a simple project by clearly defining the artwork, preparing a print-ready file, printing on PET film, powdering and curing, transferring to a plain test garment, and evaluating durability. Use a design-to-dress workflow mindset: start simple, verify fit and color, and document every setting to reproduce results in future DTF projects.
| Step | Stage | Core Actions (What to Do) | Key Outcome / Notes |
|---|---|---|---|
| Step 1 | Design and File Preparation | Create print-ready artwork; ensure 300 dpi; limit color palette; include white underbase; set margins/alignment; save as PNG or PDF/SVG; keep a master copy. | Print-ready files with clean color fidelity and repeatable placement. |
| Step 2 | Printing Prep and the DTF Print Process (Printing Basics) | Calibrate the DTF printer; use RIP software for color separation and white ink; print on PET film; ensure thick enough white underbase; verify orientation/margins. | High-quality, properly aligned film print with accurate color management. |
| Step 3 | Powdering and Curing (Preparing the Film) | Apply uniform adhesive powder; cure per supplier guidance; shake off excess powder; inspect surface; maintain temp/airflow during curing. | Stable transfer layer with clean, powder-free surface for crisp transfers. |
| Step 4 | Transfer to Fabric (Heart of the Workflow) | Pre-press the garment; align film; set heat press to recommended temp/time (e.g., around 160–170°C for 10–15s); use even pressure; peel hot/warm as advised. | Accurate placement and vibrant, well-bonded transfers. |
| Step 5 | Finishing, Curing, and Care (Post-Transfer Care) | Cure finished print; provide care instructions (wash inside-out, cold water); test on a sample; follow post-press finishing specs. | Durable print with clear care guidance; ready for real-world use. |
| Step 6 | Troubleshooting Common Challenges (Becoming a Better Operator) | Address pale colors, color shifts, film sticking, cracking on stretch fabrics, ghosting. Re-check white underbase, calibrate color profiles, monitor curing, ensure film alignment. | A proactive approach reduces repeat issues and improves consistency over time. |
| Step 7 | Tips for Beginners (Beginners DTF Tips) | Start simple with one- or two-color designs; document settings; invest in reliable heat press and accessories; test on swatches; keep workspace clean; build a fabric library. | Build confidence and achieve repeatable results as you scale up. |
| Step 8 | Budgeting, Equipment, and Materials (Getting Started Right) | Invest in a capable DTF printer with compatible inks; PET film; adhesive powder and curing system; a quality heat press; finishing/tools; design software; balance quality and cost. | A solid, scalable setup supports a reliable design-to-dress workflow as you grow. |
Summary
Conclusion: The DTF workflow for beginners offers a practical, scalable path from concept to finished garment. By focusing on the design phase, printing basics, powder preparation, transfer technique, and finishing care, you establish a reliable design-to-dress workflow that yields repeatable results. Practice, document settings, and starting with simple designs help build confidence. With experience, you’ll refine color management, master transfer steps, and expand to more fabrics and applications, producing vibrant, durable garments that showcase your creativity and technical skill.