DTF printing on fabric has emerged as a powerful method for producing vivid, durable designs on textiles. It blends the precision of digital ink with a film-based transfer, delivering vibrant colors with DTF printing for a broad range of fabrics. Direct-to-film printing for textiles offers flexibility, allowing you to work on cotton, blends, and even some synthetics without lengthy pre-treatment. DTF printing on textiles often offers strong color fidelity and durability, making it a compelling alternative when comparing DTG vs DTF for fabric. To ensure lasting brilliance, mastering DTF curing and finishing are essential for wash-fast, flexible results.
Equivalently, this technique can be described as film-to-fabric transfer or film-based textile printing, emphasizing the role of the PET sheet in delivering color. LSI-friendly terms you might encounter include film-based transfer on fabrics, white-ink underbase workflows, and heat-press finishing to fix images. Using these alternative terms helps align the topic with related concepts like color management, durability, and wash-fastness, creating a web-friendly context for readers and search engines alike.
DTF printing on fabric: Achieving vibrant colors and durable results
DTF printing on fabric has transformed how designers and makers approach color, offering a path to vivid, durable prints across a wide range of textiles. When you pair the right combination of white underbase, high-quality PET transfer film, and properly calibrated inks, you can achieve color density that rivals traditional screen printing while maintaining a soft hand and flexibility for different fabrics. The focus on the fabric’s base and the print layers matters as much as the design itself, because a robust underbase can make colors pop even on darker substrates. This is especially true for garments and home textiles where opacity and brightness are essential for the final look.
Vibrant colors with DTF printing come from careful parameter control and material selection. The workflow supports a broader color gamut and consistent results across batches, which is a key advantage over some alternative methods. With DTF printing on fabric, you gain the ability to print full-color artwork without pre-treating every garment, reducing steps while preserving color fidelity. The result is not just bright ink; it’s a print that retains its vibrancy through washes and wears, thanks to a well-managed transfer process and durable bonding between ink, adhesive, and textile.
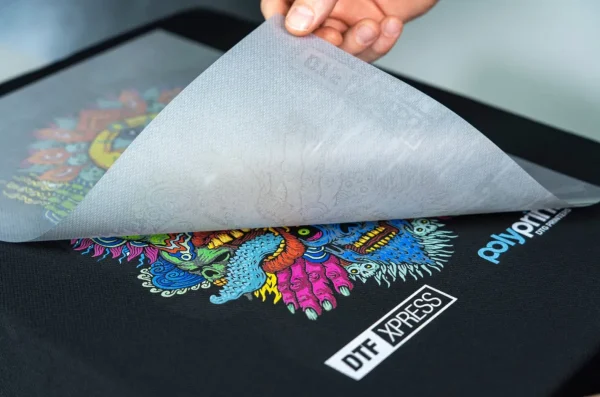
Understanding the science: how direct-to-film printing for textiles works
Direct-to-film printing for textiles works by first applying your design to a PET transfer film using specialized inks. A white underbase is typically printed on dark fabrics to ensure opacity and brightness, creating a foundation that makes colors appear true and vivid once transferred. After printing, a layer of hot-melt adhesive powder is spread across the ink, and the film is cured so the powder adheres securely. The transfer is then pressed onto the fabric with controlled heat and pressure, releasing the inks onto the textile and leaving behind a vibrant image.
This process brings several advantages for color reproduction and consistency. The white underbase improves opacity, enabling crisp lines and solid color blocks on darker substrates. Compared with direct-to-garment approaches, DTF can be more scalable and versatile across a wider range of fabrics, which helps maintain color density and evenness. When done correctly, DTF printing on textiles delivers sharp edges, smooth gradients, and lasting color that holds up to repeated washes.
Choosing fabrics and materials for vibrant colors with DTF printing
Choosing the right fabrics is a foundational step for achieving vibrant colors with DTF printing. Light to medium-weight cotton and cotton blends are reliable starting points, while polyester blends can work with adjusted heat and curing. Very dark or textured fabrics may alter color appearance, so testing swatches before production is essential. The fabric’s color also matters: light fabrics naturally yield the brightest results, but the white underbase on dark fabrics unlocks opacity and color brightness.
Beyond the fabric, material quality—films, powders, and inks—plays a decisive role in consistency. High-quality PET transfer films with stable transparency support even color transfer, while hot-melt adhesive powders that coat evenly help prevent ghosting or missing areas. Inks formulated for DTF systems must exhibit good white opacity, color gamut, and reliable curing behavior. Selecting compatible films, powders, and inks—along with proper curing—sets the stage for vibrant, durable transfers.
DTF curing and finishing: ensuring wash-fastness and longevity
DTF curing and finishing is a critical phase that determines how well colors hold up over time. After the adhesive powder is applied to the printed film, curing is performed to fix the powder to the film’s surface. Proper curing reduces powder shedding during the transfer and ensures a solid bond between the ink and the textile. The curing step also influences wash-fastness, abrasion resistance, and color retention, so it’s worth investing in a reliable curing method and adhering to manufacturer guidelines.
Post-transfer finishing can include a brief post-press cure or additional stabilization steps to maximize color fixation. These finishing steps contribute to long-term vibrancy, helping colors resist fading after multiple washes and normal wear. Carefully documenting cure temperature, dwell time, and pressure for each fabric type helps reproduce consistent results across runs and projects, which is especially valuable for small businesses and personal studios.
DTG vs DTF for fabric: choosing the best method for color and feel
DTG vs DTF for fabric is not a one-size-fits-all decision. Direct-to-garment printing can yield incredibly soft hand feels on cotton and related fabrics, but it often requires pre-treatment and can struggle with certain blends or dark substrates. DTF, in contrast, offers broader fabric compatibility, strong color density, and simpler workflows, especially when producing designs that involve bright, saturated hues. For larger runs or diverse textiles, DTF can be more cost-effective and scalable.
When deciding between these methods, consider project goals: on-demand customization, substrate variety, and wash durability. If you need vibrant, opaque colors on a mix of fabrics with a simpler setup, DTF can be the practical choice. If the project demands extremely soft hand feel on compatible fabrics or minimal weight, DTG might be preferred, but weigh the trade-offs in cost, white ink usage, and color saturation. Understanding the differences helps you select the approach that best aligns with your product line and production capabilities, addressing the question of DTG vs DTF for fabric.
Design, color management, and optimization for DTF printing on textiles
Design for DTF printing on textiles starts with color management and image preparation. Creating vector-based artwork or high-resolution raster files at 300 dpi helps preserve sharp edges and smooth color gradients once transferred. Working in sRGB and converting to printer-specific color profiles supports consistency across different fabrics and lighting conditions. A solid plan for white underbase on dark fabrics is essential to ensure that bright reds, greens, and blues print with maximum brightness.
Color management is only part of the optimization. Practical workflows include organizing layers, planning print sequences for multi-color designs, and testing on representative swatches to verify color accuracy after transfer. Documenting settings—fabric type, ink brand, film, powder, and curing parameters—facilitates reproducibility across batches. By combining careful design, calibration, and iterative testing, you can achieve vibrant colors with DTF printing and maintain consistent results across varied textile applications.
Frequently Asked Questions
What is DTF printing on fabric and how does it achieve vibrant colors with DTF printing on textiles?
DTF printing on fabric is a process that prints designs onto a PET transfer film using white underbase and color inks, then transfers the design to fabric with heat. The use of a white underbase on dark fabrics and full-color inks enables vibrant colors with DTF printing on textiles, delivering opaque, bright results on cotton, blends, and more. This method also tends to yield a softer hand compared with some alternatives.
How does DTF curing and finishing affect color accuracy and durability on fabric?
DTF curing and finishing are essential steps that secure the adhesive powder to the film and set the ink for long wash-fastness. Proper curing reduces powder shedding and improves color fixation, contributing to durable, vibrant colors with DTF printing on fabric. Finishing steps, such as post-press curing and controlled cooling, help maintain consistency across batches.
DTG vs DTF for fabric: which method offers brighter colors and better durability for DTF printing on textiles?
DTG vs DTF for fabric compares two distinct approaches. DTF printing on textiles generally provides stronger color density, broader fabric compatibility, and a softer hand after transfer, while DTG can be faster on light fabrics but may require pre-treatment. For vibrant colors with DTF printing on textiles, DTF typically delivers more opaque, consistent results on both dark and light fabrics, especially at scale.
What is direct-to-film printing for textiles and how does it relate to DTF printing on fabric?
Direct-to-film printing for textiles describes the process of printing onto a PET film with white underbase and color inks, then transferring to fabric using an adhesive powder and heat. This is the core workflow of DTF printing on fabric, enabling vibrant color reproduction, substrate versatility, and streamlined production across different textiles.
Which fabrics are best suited for DTF printing on textiles, and how can you maintain vibrant colors on fabric?
Fabrics that work well with DTF printing on textiles include light- to medium-weight cotton and cotton blends; polyester blends can also be used with appropriate heat and curing adjustments. Light fabric colors typically yield the brightest results, while dark fabrics benefit from a white underbase to maintain vibrancy. To maintain vibrant colors, use quality films and powders, optimize curing parameters, manage heat transfer carefully, and perform swatch testing for color accuracy.
What are the key steps in the DTF transfer process to ensure consistent color and long-lasting results on fabric?
Key steps include: 1) prepare the artwork with clean vectors and a white underbase for dark fabrics; 2) print on PET film with correct color settings; 3) apply a uniform layer of hot-melt adhesive powder; 4) cure the film to fix the powder; 5) align and press the film onto the fabric using the recommended heat, time, and pressure; 6) peel after cooling and perform any required post-press curing. Following these steps ensures consistent color transfer and durable results for DTF printing on fabric.
| Aspect | Key Points |
|---|---|
| Focus keyword | DTF printing on fabric |
| Related keywords | vibrant colors with DTF printing; direct-to-film printing for textiles; DTF printing on textiles; DTG vs DTF for fabric; DTF curing and finishing |
| Post Title | DTF printing on fabric: How to create vibrant colors |
| Meta Description | Master vibrant colors with DTF printing on fabric. Learn selection, design tips, curing, and finishing for successful direct-to-film printing on textiles. |
| Core Process | Print on PET film with white underbase, apply hot-melt adhesive powder, cure, then press the film onto fabric to transfer colors. |
| Choosing Fabrics & Materials | Light to medium cottons/cotton blends are ideal; polyester blends can work with adjusted heat; ensure white underbase for dark fabrics; use quality PET films, powders, and inks. |
| Design & Color Management | Use 300 dpi (or vector), sRGB workflow, white underbase on dark fabrics, plan smooth gradients, test swatches, and manage color profiles. |
| Step-by-Step Workflow | 1) Prepare artwork 2) Print on PET film 3) Apply adhesive powder 4) Cure 5) Align & press 6) Peel & cool 7) Final curing |
| Post-Transfer Care | Wash inside out (gentle cycle), cold/warm water; use mild detergents; low-heat tumble dry or air dry; iron with protection sheets; store away from direct sunlight. |
| Common Challenges & Troubleshooting | Color dullness, ghosting, cracking, white ink opacity; adjust underbase, ensure proper curing, verify film/alignment, and test color paths. |
| Tips to Maximize Vibrant Colors | Test on swatches, maintain controlled environment, document parameters, and calibrate equipment periodically. |
| Cost & Scalability | Can be cost-effective for small to mid-sized runs; optimize with batch printing, standardized workflows, and quality materials to scale. |
| Blog Post Structure | Introduction, Main Body, Conclusion. |
Summary
DTF printing on fabric offers a powerful way to achieve vibrant, durable designs across a wide range of textiles. By selecting the right fabrics, optimizing color management, and following a precise transfer process, you can produce vivid, opaque images on dark fabrics and bright, detailed prints on light fabrics. The workflow—from artwork preparation and printing on PET film to curing, powder adhesion, and heat transfer—delivers consistent results with flexible fabric compatibility and scalable production. Proper post-transfer care, troubleshooting, and ongoing calibration further protect color vibrancy through repeated washes. Whether you’re creating custom apparel, home textiles, or promotional items, mastering these fundamentals of DTF printing on fabric helps you achieve professional, market-ready results with confidence.