UV DTF transfer opens a fast, durable path to vibrant designs on apparel and a range of substrates. As a growing method in the direct-to-film printing space, also called direct-to-film printing with UV inks, it leverages UV-curable inks to cure quickly under UV light. For DTF printing for beginners, this approach blends the portability of DTF with the punch of UV inks, delivering sharp images, bold colors, and strong wash resistance. In this UV DTF transfer guide, you will learn how UV DTF vs traditional DTF compares, the materials you will need, and practical steps to produce your first transfers. If you are exploring UV inks for DTF, this overview introduces the key differences, benefits, and considerations for success.
From a different perspective, this is UV-curable film transfer for textiles, a UV-ink powered DTF process that prints onto a clear film, then cures with light before heat pressing. In LSI terms, you will see it discussed as UV-curable direct-to-film printing, UV-based transfer on fabrics, or UV-ink driven film printing—labels that point to the same workflow without getting stuck on a single name. The focus for beginners is on the core needs: a compatible printer or upgrade path, proper curing equipment, suitable transfer films, and safe handling of inks and powders. By thinking in these related terms, you will more easily locate tutorials, troubleshooting tips, and project ideas across sources and communities.
Understanding UV DTF Transfer: What It Is and Why It Matters
UV DTF transfer refers to a direct-to-film printing method that uses UV-curable inks to print designs onto a clear transfer film. After printing, the image is cured with a UV light source, then affixed to a garment or substrate using heat and pressure. This approach is commonly discussed in guides and resources focused on UV DTF transfer, offering a streamlined path from concept to finished product.
Why it matters for those exploring direct-to-film workflows is the speed and precision that UV-curing provides. When you pair UV inks with a film-based transfer, you can achieve sharp edges, strong color fidelity, and improved wash durability. This aligns with the concept of direct-to-film printing with UV inks and highlights how a UV DTF transfer can fit into a broader DTF printing strategy.
For beginners, understanding the core idea through a practical lens helps—UV DTF transfer combines the portability of DTF with the rapid curing of UV inks, helping you move quickly from design to a tangible garment.
UV DTF vs Traditional DTF: Key Differences for Quality and Cost
Traditional DTF printing usually relies on water-based inks that require careful drying and powdering, followed by heat pressing. UV DTF transfer shifts some of these dynamics by using UV-curable inks that cure immediately under UV light and then proceed with the standard transfer process. The major differences involve curing time, edge definition, and the equipment used for curing.
From a cost and workflow perspective, UV DTF can require higher upfront investment in curing hardware, but can offer faster production and improved color stability when properly cured. For those interested in DT F printing for beginners, weighing the upfront costs against speed, durability, and required safety measures is essential to decide whether UV DTF is the right fit.
Overall, UV DTF vs traditional DTF often boils down to project scope: simpler, fast-turn designs may benefit from UV curing, while very small runs or very dark substrates might demand more nuanced underlays and post-processing.
Essential Materials and Setup for UV DTF Printing
Key materials for UV DTF include UV-curable inks or a UV-enabled DTF printer, a transfer film compatible with UV inks, adhesive powder, a heat press or platen system, a UV curing lamp, PPE, and color management software. Focusing on UV inks for DTF, you’ll want to ensure your inks, film, and curing unit are all compatible with one another to achieve consistent results.
Setup considerations matter as well: verify that your printer is configured for UV operations, calibrate color profiles, and confirm film characteristics align with your substrate. Describing this as direct-to-film printing with UV inks emphasizes the integrated nature of curing and transfer, from artwork to final garment.
Having a clean, ventilated workspace and a routine for cleaning print heads and surfaces will help maintain print quality and prolong equipment life, which is especially important for UV DTF workflows that involve curing lamps and powders.
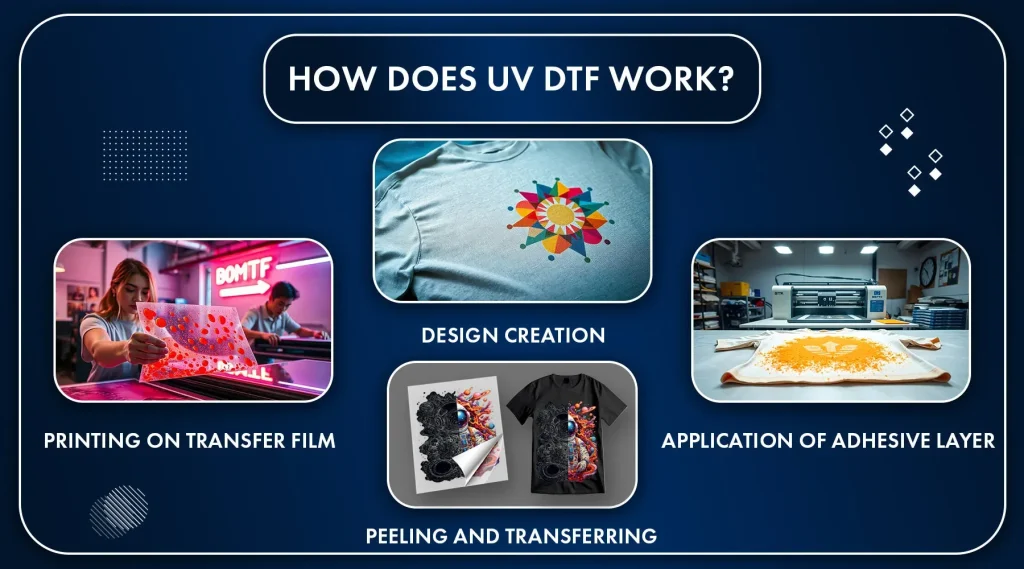
Step-by-Step Workflow for UV DTF Transfer
Step-by-step workflows for UV DTF transfer begin with preparing your design at high resolution (at least 300 DPI) and ensuring color profiles are appropriate for UV inks. Then set up your printer and materials, load the transfer film, and verify the curing lamp is ready. Print on the transfer film using a mode that prioritizes color accuracy and edge sharpness.
Immediately after printing, cure the film with UV light to fully harden the inks, then apply adhesive powder evenly. Pre-press the substrate to remove moisture, place the film graphic-side-down on the fabric, and press with the appropriate temperature, pressure, and dwell time. Finally, peel when cool and finish with any required post-press steps.
For beginners, framing these steps within the realm of DT F printing for beginners and direct-to-film printing with UV inks keeps expectations realistic and helps you build a repeatable process that you can refine over time.
Troubleshooting, Color Management, and Quality Tips
Color management is crucial in UV DTF workflows. Common issues include color drift, dull colors, and misaligned edges. Revisit your color workflow, recalibrate printers, update ICC profiles, and consider printing a white underlay to boost opacity and brightness on dark fabrics. These practices align with the goals of using UV inks for DTF to achieve consistent results.
Quality tips also cover even powder application, proper curing, and appropriate substrate choice. Ensure even curing across the print, maintain consistent heat-press parameters, and monitor substrate compatibility to minimize issues like ghosting or peeling.
Safety and maintenance should not be neglected: use proper ventilation, perform regular cleaning, dispose of waste according to regulations, and wear protective gear when handling powders and inks. These steps help sustain long-term, reliable UV DTF transfers.
Getting Started with Your First UV DTF Project
Getting started means choosing simple designs with bold lines and a limited color palette to learn fundamentals without becoming overwhelmed. For beginners, starting with light-colored fabrics makes adhesion and color visibility more forgiving while you master the workflow.
Document your settings, results, and any adjustments you make—this is invaluable as you progress through UV DTF transfer projects. As you gain experience, you’ll refine color management, substrate choices, and transfer techniques, laying the groundwork for repeatable, professional-looking prints that suit gifts, branding, or personal projects.
If you’re just starting out, treat this as a learning journey and use the guide examples to gradually expand to more complex artwork. With patience and practice, UV DTF transfer can become a reliable cornerstone of your printing toolkit, offering bold visuals with the speed and durability that modern textiles demand.
Frequently Asked Questions
What is UV DTF transfer and why is it relevant for DTF printing for beginners?
UV DTF transfer prints designs with UV-curable inks on a clear transfer film and cures the ink with UV light before heat pressing onto fabric. It delivers sharp details, vibrant colors, and quick curing, making it a beginner-friendly option within DTF printing for beginners.
How does UV DTF transfer compare to traditional DTF?
UV DTF vs traditional DTF: Traditional DTF uses water-based inks that require drying and powdering, while UV DTF uses UV-curable inks cured on the spot. UV DTF offers faster production, crisper edge definition, and potentially better color stability, though it may require more specialized UV curing equipment and higher ink costs.
What materials and equipment do I need for UV inks for DTF transfer?
For UV inks for DTF transfer, you’ll need UV-curable inks or a UV-enabled DTF setup, a transfer film compatible with UV inks, adhesive powder, a heat press, a UV curing lamp, ventilation and PPE, and color-management software to maintain accurate colors.
What is the standard workflow for UV DTF transfer using direct-to-film printing with UV inks?
A typical workflow: design at high resolution, print on the UV transfer film using direct-to-film printing with UV inks, cure the print with a UV lamp, apply adhesive powder, pre-press the substrate, transfer the design with heat and pressure, then peel and finish as needed.
What are common issues with UV DTF transfer and how can I troubleshoot them as a beginner?
Common issues include color drift, incomplete curing, uneven powder, and post-wash peeling. Troubleshoot by recalibrating color profiles, ensuring thorough curing, applying powder evenly, and verifying heat/press parameters. Start with test runs to build reliable settings.
What substrates work best with UV DTF transfer, and what does the UV DTF transfer guide say about dark fabrics?
Light-colored, smooth fabrics typically yield the best results for UV DTF transfer. Dark fabrics can work with a white underlay or underprint, as recommended in the UV DTF transfer guide, and beginners should start with cotton or polycotton blends to learn adhesion and curing nuances.
| Topic | Key Points |
|---|---|
| What is UV DTF transfer |
|
| UV DTF transfer vs traditional DTF |
|
| Materials and equipment |
|
| Getting started: step-by-step (overview) |
|
| Practical tips for beginners |
|
| Pros and cons |
|
| Design and production tips |
|
| Maintenance and safety |
|
| UV DTF transfer in practice: uses and substrates |
|
| Common issues and troubleshooting |
|