UV DTF Transfer on T-Shirts has emerged as a powerful way to achieve vibrant, durable designs on fabric, opening new possibilities for artists, brands, and hobbyists alike. If you’re curious about bringing bold, photographic-quality art to textiles, this guide walks you through a practical, step-by-step approach that highlights essential tools, best practices, and real-world tips. Along the way you’ll learn how to apply UV DTF transfer, with clear instructions on setup, curing, alignment, and heat pressing to help you minimize errors and maximize color fidelity. The discussion also touches on how UV DTF transfer compares to traditional methods and what projects benefit most from this approach, so you can choose the method that matches your fabric and timeline. With the right materials, a reliable heat press, and careful pre- and post-press care, you can produce professional results that stand up to washing, wear, and repeated use.
This approach leverages UV-curable inks and a transfer film to embed high-detail designs into a range of fabrics. In practical terms, it sits at the intersection of digital printing and garment decoration, offering sharp imagery, reduced texture, and strong adhesion when paired with the right heat-press protocol. Alternative terms you might encounter include UV-activated ink transfers for apparel or photo-quality textile transfers, all described here to align with search intent across related topics. When planning projects, consider fabric type, curing times, and pre-press preparation, which influence durability and wash-fastness as much as color vibrancy.
What is UV DTF Transfer on T-Shirts and Why It Stands Out
UV DTF Transfer on T-Shirts uses UV-curable inks printed onto a special transfer film, which then bonds to fabric to deliver sharp details, bold colors, and a smooth finish. This approach combines the versatility of digital artwork with a robust transfer system that is well-suited for photographic-quality designs and complex graphics. When you choose UV DTF printing on shirts, you’re leveraging a process that can reproduce fine line work and subtle color gradients with greater fidelity than many traditional methods.
The appeal of UV DTF Transfer on T-Shirts lies in its ability to produce durable designs on a wide range of fabrics, from cotton to blends. The transfer film and UV-curable inks create a strong bond that resists cracking and fading with washing. As you explore how to apply UV DTF transfer, you’ll notice that the result tends to have crisper edges and a smoother overall appearance, particularly for detailed artwork and photography-style images. This makes UV DTF printing on shirts a compelling option for logos, event designs, and vibrant art tees.
UV DTF Transfer vs Traditional Methods: DTF Transfer on T-Shirts, Screen Printing, and DTG
Compared with traditional methods like screen printing, DTG (direct-to-garment), and standard DTF, UV DTF transfer uses UV-curable inks on a transfer film that is cured before heat pressing. This curing step helps lock in color, reduce smudging, and improve edge definition, especially on intricate artwork. The result is often crisper images with better color accuracy, particularly for high-detail designs suited to UV DTF printing on shirts.
However, UV DTF transfers require different materials and calibration than conventional DTF or DTG processes. You’ll need a UV-capable ink system and a compatible transfer film, plus precise heat-press settings to avoid issues like edge lifting or color shifts. When you compare UV DTF transfer to other methods for your production, consider factors such as fabric type, design complexity, and throughput needs, and consult heat press instructions for UV DTF to optimize results.
Essential Materials and Tools for UV DTF Transfer on T-Shirts
A successful UV DTF project starts with the right toolkit. Key items include UV DTF transfer film or sheets with an adhesive-ready print, UV-curable inks compatible with your printer or pre-printed sheets from a trusted supplier, and a heat press with reliable temperature control. Having a silicone or Teflon sheet, a sturdy pressing pillow or clamps, and sharp cutting tools helps ensure clean edges and flat transfer surfaces that yield professional results.
You’ll also want surface cleaner and lint-free cloths to prep garments, pre-wash fabrics to remove sizing, and PPE when handling uncured inks or films. Selecting garments suitable for UV DTF—such as cotton and many cotton blends—will further improve adhesion and durability. With the right materials, you’ll be positioned to achieve consistent, high-quality UV DTF transfer results across batches.
Preparing Artwork and Garments for UV DTF Printing on Shirts
Preparation starts with the artwork. Create high-resolution designs at 300 ppi or higher to preserve detail when printed on the UV DTF transfer film. If your artwork includes white or light areas, evaluate whether a white underlayer is needed to achieve solid opacity, or if the film’s inherent opacity is sufficient. Align your design to the garment’s center front and mark reference points to ensure consistent placement across items.
Garment preparation is equally important. Pre-wash and thoroughly dry fabrics to remove sizing and residues that could affect adhesion. Remove wrinkles with a press or steamer, then ensure a flat surface for transfer. Clear alignment guides and stable surfaces help maintain accuracy during the transfer application, contributing to a professional, repeatable result when performing UV DTF printing on shirts.
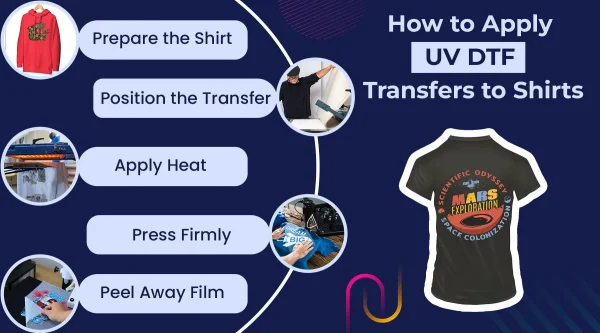
Step-by-Step Guide: How to Apply UV DTF Transfer on Shirts
To begin, print your design onto the UV DTF transfer film using UV-curable inks and cure the print with a UV light source according to the manufacturer’s guidelines. This curing step stabilizes colors and reduces smudging during handling. After curing, verify alignment by lightly placing the film on the garment to check positioning before final bonding.
Next, trim and weed as needed, pre-press the garment to remove moisture and create a smooth surface, and position the transfer with the print facing down. Apply heat at the recommended temperature (typically around 310–325°F or 155–165°C) with medium to firm pressure for 12–15 seconds, then peel the carrier while the garment is warm if required. Allow the print to cure for several minutes and finish with proper post-press care, such as turning garments inside out for washing and following gentle care guidelines to preserve the design.
Care, Troubleshooting, and Longevity of UV DTF Prints
Proper care extends the life of UV DTF transfers. Wash garments inside out on a mild cycle and avoid high-heat drying to minimize wear. Keeping prints away from direct sunlight and storing finished pieces in a cool, dark place helps prevent yellowing or color shift over time. Periodic testing of new UV DTF films and inks on scraps can also protect long-term results, especially when expanding production.
Common issues like color fading, edge lifting, or cracking usually trace back to curing, substrate compatibility, or suboptimal heat pressing. Reassess curing time, verify the UV light source’s exposure, and ensure garment material matches the film’s recommendations. For persistent problems, consult heat press instructions for UV DTF and adjust temperature, pressure, or dwell time as needed, and consider a secondary cure after washing for enhanced durability.
Frequently Asked Questions
What is UV DTF Transfer on T-Shirts and how does it differ from standard DTF transfer?
UV DTF Transfer on T-Shirts uses UV-curable inks printed on a transfer film that is cured before transfer, delivering sharp detail and vibrant color. In comparison to standard DTF, which relies on adhesive powders and hot-melt layers, UV DTF can offer crisper edges and faster production under the right conditions, with specific curing requirements for durability.
How to apply UV DTF Transfer on T-Shirts?
To apply UV DTF Transfer on T-Shirts, print the design on UV DTF film, cure the inks, pre-press the garment, trim as needed, align the transfer, and press at about 310–325°F (155–165°C) with medium to firm pressure for 12–15 seconds. Peel the carrier while warm if required by the film, then allow curing time to finalize adhesion.
What materials do you need for UV DTF Transfer on T-Shirts?
Essential materials include: UV DTF transfer film with adhesive, UV-curable inks-compatible printer or pre-printed UV DTF sheets, a heat press with consistent temperature control, silicone/teflon sheet, pre-press tools, trimming/weeding tools, a clean garment surface, suitable fabrics (cotton or blends), and basic PPE if handling uncured inks or films.
What are the heat press instructions for UV DTF on T-Shirts?
Heat press at roughly 310–325°F (155–165°C) with medium to firm pressure for 12–15 seconds. Pre-press the garment for 5–10 seconds, place the transfer with the print facing down, and use a protective sheet. Avoid moving the garment during pressing, and follow the film’s recommended post-press cure and peeling guidance.
What common issues can occur with UV DTF Transfer on T-Shirts and how can I troubleshoot?
Common issues include faded or uneven color (check curing time and UV exposure), edge lifting (verify thorough pre-press and adequate pressure), white under-coverage (confirm white underlayer needs or film opacity), cracking or peeling after washing (ensure proper curing and fabric compatibility), and misalignment (use alignment marks or templates). Address each by adjusting curing, pressure, and placement as needed.
How should I care for UV DTF prints to maximize their life on T-Shirts?
Care for UV DTF prints by washing inside-out on a gentle cycle with cold to warm water, avoiding high-heat tumble drying. Air-dry when possible, store away from direct sunlight, and test new films or inks on scraps before production runs to preserve color and adhesion.
| Topic | Key Points |
|---|---|
| Introduction |
|
| What makes UV DTF Transfer on T-Shirts appealing |
|
| Understanding the Basics: UV DTF vs. Traditional Methods |
|
| Materials & Preparation: What You Need |
|
| Preparing the Garment and Artwork |
|
| Step-by-Step Process: How to Apply UV DTF Transfer on T-Shirts |
|
| Tips for Achieving Best Results |
|
| Troubleshooting Common Issues |
|
| Care, Maintenance, and Future-Proofing Your UV DTF Prints |
|
| Conclusion |
|
Summary
UV DTF Transfer on T-Shirts offers a powerful path to high-resolution, durable apparel designs. This conclusion underscores how a clear workflow—from materials and garment prep to heat pressing and care—enables professional results that rival traditional methods, with versatility across fabrics and designs for hobbyists and small businesses alike.