The DTF transfer process has surged in popularity for custom apparel because it delivers vibrant results, durability, and flexibility across fabrics. If you’re new to Direct-to-Film (DTF) or you’re looking to optimize your workflow from design to garment, this guide outlines the DTF printing process and the journey. You’ll learn what the workflow involves, how to prepare designs, how the design is transferred, and practical tips to produce professional-looking tees, hoodies, and other garments. By understanding the core stages—from design to garment—you’ll be better equipped to plan projects, select the right materials, and troubleshoot common issues along the way. This concise overview helps you optimize production, achieve vibrant color, and build reliable results across fabrics.
Viewed through an alternative lens, this approach is a film-based transfer workflow that starts with artwork and ends with a bonded print on fabric. Commonly called the direct-to-film technique, it relies on a specialized transfer film, adhesive powder, and a heat-press process to deliver bold colors on a range of textiles. In practice, designers think in terms of a studio-ready finish, focusing on color fidelity, edge sharpness, and durable adhesion rather than the equipment name. This semantic framing aligns with related concepts such as film-based printing, color-fast transfers, and garment decoration with a film-based method. With careful workflow planning, printers can apply this method across multiple garment styles while maintaining consistent results.
DTF printing process fundamentals for vibrant garments
DTF printing process has become the go-to method for custom apparel because it delivers bright color, durable results, and flexibility across fabrics. In the DTF printing process, artwork is prepared and printed onto a PET transfer film using specialized inks, setting the stage for vibrant reproduction on different garment colors.
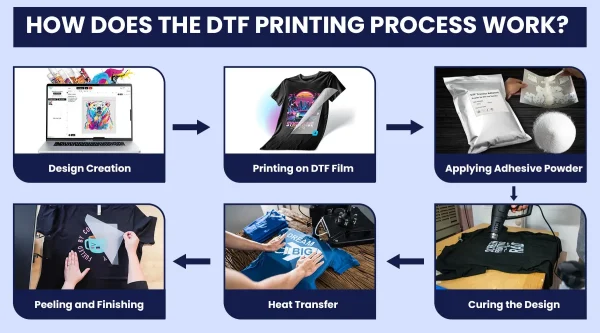
The core workflow typically includes printing on the transfer film, applying an adhesive powder, curing the powder, and finally transferring the design to fabric with heat and pressure. When done correctly, the result is a soft hand, strong wash durability, and color fidelity that remains after multiple washes.
To get started, focus on CMYK color management and clean layers. Use the DTF design tips such as starting with vector outlines and raster images at 300–360 DPI to ensure crisp edges, and separate color layers to simplify the white layer when needed. Framing your design with these tips helps align with practical DTF design principles and supports successful outcomes.
DTF transfer steps: from artwork to wearable art
The DTF transfer steps guide you from concept to finished garment: begin with artwork and color separation, proceed to printing on transfer film, add and cure adhesive powder, then execute the heat-and-press transfer to fabric.
During printing, verify printer calibration, bed leveling, and nozzle alignment to maintain color accuracy and avoid banding. Checking the printed film for smudges or gaps helps catch issues before they translate to the garment.
After curing, ensure the transfer is warmed and pressed with even pressure. Select the correct peel method (cold or warm) as recommended by your film, because peel technique affects edge clarity and durability.
DTF design tips for reliable color and detail
DTF design tips emphasize planning for a CMYK workflow, strong contrast, and edge-to-edge detail. By designing with color management in mind, you can predict how the ink and white layers will render on fabric.
Keep white areas and color separations in mind: plan where the white layer will sit and how it interacts with dark fabrics. High-contrast compositions with clean edges tend to translate more reliably in the DTF transfer process.
Use crisp vector outlines for scalable elements and reserve raster assets at 300–360 DPI to preserve detail after printing. Test prints help anticipate color shifts and ensure the final garment matches the design intent. Incorporating these DTF design tips supports a smoother workflow and consistent results.
DTF vs DTG: choosing the right method for your project
DTF vs DTG: choosing the right method depends on fabric, run size, and finish goals. DTF transfers are typically versatile across cotton blends and dark fabrics, while DTG excels on 100% cotton with a softer hand.
Durability and care also differ: DTF bonds with fibers through adhesive layers, giving strong wash resistance; DTG often requires pretreatment and curing to achieve similar durability on some fabrics.
Cost, setup, and workflow impact decisions: DTF can be more economical for small to mid-volume runs because you can produce single designs without screens, whereas DTG may involve higher upfront investment and pretreatment requirements.
Garment design with DTF: templates, palettes, and color strategies
Garment design with DTF benefits from templates, reusable color palettes, and clear color strategies to maintain consistency across batches.
When planning the color palette, establish ICC profiles and consider bleed and margins to prevent important elements from being trimmed. Template-driven workflows help maintain alignment across sizes and garments.
Practical guidelines for garment design with DTF include designing for both light and dark fabrics, planning for white layers, and building elements that can be easily separated into color channels for the transfer.
Finishing, quality control, and troubleshooting in the DTF transfer process
Finishing and quality control are essential parts of the DTF transfer process to ensure repeatable results.
Common issues include cracking, peeling after washing, color shifts, and edge bleed. These are usually addressed by adjusting curing time, temperature, film, and pressure, and by performing small test runs before production.
Set up a quick post-press check to ensure the print sits flush, edges align, and the texture remains comfortable to wear. Provide care instructions to customers to maximize longevity of the transfer.
Frequently Asked Questions
What is the DTF transfer process and what are its main stages?
The DTF transfer process is a multi-stage workflow that starts with artwork and ends with a finished garment. The main stages are: design and preparation, printing on transfer film (DTF printing process), powdering and curing to fix the ink, transferring to fabric with heat and pressure, and finishing with a quality check.
What are the standard DTF transfer steps for reliable results?
Follow these DTF transfer steps: 1) design and preparation, 2) printing on transfer film, 3) powdering and curing, 4) transfer to fabric with heat and pressure, 5) finishing and quality control. For best results, follow the film and ink manufacturer guidelines, including typical temperatures around 180–205°C for 10–20 seconds and an appropriate peel method.
What DTF design tips help achieve vibrant color on fabrics?
Essential DTF design tips include designing in CMYK, using high-contrast elements, avoiding large solid white areas where possible, planning for the white layer when needed, and keeping important details away from edges.
DTF vs DTG: which method is best for garment design with DTF?
DTF transfers are versatile across fabrics, typically more durable in washes, and cost-effective for small runs, while DTG can provide a very soft hand on 100% cotton but may require pretreatment on dark fabrics. For garment design with DTF, many choose DTF for reliability, fabric compatibility, and simpler setup.
What design considerations should I keep in mind for garment design with DTF on dark fabrics?
For dark fabrics, plan for a white underlay or white layer to ensure opacity, manage colors in CMYK, prioritize high contrast, and run test prints on similar dark fabrics to confirm how colors render before production.
What are common issues during the DTF transfer process and how can I troubleshoot them?
Common issues include cracking, peeling after washing, color shifts, and edge bleeding. Troubleshoot by ensuring proper curing, maintaining consistent temperature and dwell time, applying even pressure, using the correct peel method, and calibrating color profiles; always run small test prints before larger production.
| Phase / Topic | Key Points |
|---|---|
| Introduction |
|
| Design and preparation |
|
| Printing on transfer film |
|
| Powdering and curing |
|
| Transfer to fabric |
|
| Finishing and quality control |
|
| DTF vs DTG |
|
| Materials, equipment, and workflow essentials |
|
| Design considerations and practical workflow tips |
|
| Troubleshooting common issues |
|
Summary
DTF transfer process is a dynamic, multi‑stage workflow that blends design precision with printing, adhesion, and heat transfer to produce durable, vibrant garments across fabrics. From design and preparation through printing on transfer film, powdering and curing, transfer to fabric, and finishing and quality control, understanding each phase helps you plan projects, select materials, and troubleshoot issues for professional results. By applying thoughtful design practices, choosing the right materials, and following a well‑tuned workflow, you can achieve reliable, high‑quality results with the DTF transfer process on a range of fabrics and colors.